Mortamor is the true antagonist and final boss of Dragon Quest VI. He is the Archfiend who sends four of his greatest minions to conquer both the Real World and the Dream World, however, is reign of terror was ended for good when the Hero and his party defeated him after an epic battle.
Appearance[]
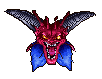
When first confronted, Mortamor appears to be an old demon with gold orbs levitating before each of his hands. Mortamor himself states that this is merely an old man and will, upon first defeat, emerge from the two golden orbs as a hulking, winged demon with spiked shoulders. When this form is defeated Mortamor will literally cast aside his body, becoming the disembodied demonic face and pair of hands he is best known as.
Biography[]
Dragon Quest VI[]
Lord Mortamor, also known as the Archfiend and the Lord of Evil, sent the four Dread Fiends Murdaw, Jamirus, Gracos and Dhuran from the Dread Realm to help take over the Real and Dream Worlds. Working from atop a high mountain within the Sea of Nothingness in his Dreadlair, the Archfiend rules with an iron fist over its inhabitants. Mortamor acts mostly through his Dread Fiends, and ordered them to seal Alltrades Abbey, Medford's Manor, Sorceria, and Cloudsgate Citadel in the process, while stripping Pegaus of her power and turning her into Peggy Sue while placing her true body on top of the Pillar. He kills Eldress Isnomor just after she grants Ashlynn Magic Burst, as payback for Gracos's defeat. Later, he entices the citizens of Greedmore Valley over the supposed treasure of Supreme Sage Issac, which turns out to be an empty chest, though if the Hero and the party take too long to reach it and defeat Averill, the Archfiend rewinds the situation to amuse himself. After Blackmar is defeated, Mortamor turns the prisoners of Gallows Moor into animals and the giants to stone as a show of power and crushing their newfound hope. When the Hero and his party finally reach Mortamor, he fights them in his three forms. Despite his impressive power, he is defeated and the link between the Real and Dream Worlds vanish while the Dread Realm falls apart. As truly wicked and powerful as Mortmor might be, even his power pales in comparison to the secret boss, Nokturnus.
Battles[]
First Phase[]
| # - Mortamor Undead Family | |||||

|
HP | MP | Attack | Defence | Agility |
| 2,000 | 255 | 290 | 250 | 150 | |
| Exp | Gold | Drop | None | ||
| 0 | 0 G | ||||
| Note: | |||||
| Abilities | |||||
| Normal attack Acts twice per turn Insane attack (125% damage) Disruptive Wave Meditation Scepter Ball Fierce Flame Frigid Ice | |||||
| Spells | |||||
| Kaboom Bounce | |||||
| Haunts at: | |||||
| Mortamor's Dreadlair | |||||
Even in his first form, Mortamor can prove quite challenging. However, as this is still only his first form, you will not want to use up all your MP on this form, especially as his next two forms are much more difficult. Oomph is incredibly useful for finishing him swiftly, but don't bother buffing up yet as he'll more than likely use Disruptive Wave.
Second Phase[]
| # - Mortamor Undead Family | |||||
|
|
HP | MP | Attack | Defence | Agility |
| 3000 | 255 | 410 | 300 | 90 | |
| Exp | Gold | Drop | None | ||
| 0 | 0 G | ||||
| Note: | |||||
| Abilities | |||||
| Normal attack Acts twice per turn Charges into enemy with his spiky shoulders Mercurial Thrust Defending Champion Scorch | |||||
| Spells | |||||
| Buff Oomph Kasap | |||||
| Haunts at: | |||||
| Mortamor's Dreadlair | |||||
Now is when you'll want to start buffing up your team. You will also want to know Disruptive Wave yourself, as he will use Buff and Oomph to make him even more dangerous. He is primarily a physical fighter, though he does know Scorch so be very careful when fighting him. After defeating him, he will 'shed this useless body' and appear as his most iconic and deadly form.
Final Phase[]
| # - Mortamor Undead Family | |||||
|
|
HP | MP | Attack | Defence | Agility |
| 2500 | 254 | 300 | 340 | 120 | |
| Exp | Gold | Drop | None | ||
| 0 | 0 G | ||||
| Note: | |||||
| Abilities | |||||
| Normal attack Freezing Blizzard Lullab-Eye Ferocious Roar Disruptive Wave Pyre o' Fire Says an evil prayer (Restores MP) | |||||
| Spells | |||||
| Kaboom Kafrizzle Magic Burst | |||||
| Haunts at: | |||||
| Mortamor's Dreadlair | |||||
You will now have three targets, all of which will be attacking you at the same time. The head is the most dangerous, knowing Ferocious Roar and Pyre o' Fire also means that even if you're buffed you won't necessarily be safe. Lullab-Eye makes this fight incredibly dangerous as well, especially if he so chooses to put your healer to sleep. Because of this, it's generally wise to have more then one healer for this phase. He still knows Disruptive Wave, and in this form using it doesn't hinder him as much as the previous two forms, making it hard to use Buff and Oomph. After taking out the two claws, defeat the head as quickly as possible! This is very important as once the head is half-killed, it can use Magic Burst. Undead Undoer and Pearly Gates also work well against him, since he is part of the Undead family of monsters.
Right Claw[]
| # - Right Claw ??? Family | |||||
|
|
HP | MP | Attack | Defence | Agility |
| 1700 | 255 | 330 | 180 | 70 | |
| Exp | Gold | Drop | None | ||
| 0 | 0 G | ||||
| Note: | |||||
| Abilities | |||||
| Normal attack Talon attack Beatdown Knuckle Sandwich Disruptive Wave | |||||
| Spells | |||||
| Multiheal Zing | |||||
| Haunts at: | |||||
| Mortamor's Dreadlair | |||||
The more powerful of the two claws, the right claw is quite the physical fighter. If either of the other two parts are killed before the right claw, it might be able to bring it back with Zing and can heal the other two parts with Multiheal.
Left Claw[]
| # - Left Claw ??? Family | |||||
|
|
HP | MP | Attack | Defence | Agility |
| 2000 | 255 | 270 | 180 | 180 | |
| Exp | Gold | Drop | None | ||
| 0 | 0 G | ||||
| Note: | |||||
| Abilities | |||||
| Normal attack Claw Slash Beatdown Backdraft | |||||
| Spells | |||||
| Kazing | |||||
| Haunts at: | |||||
| Mortamor's Dreadlair | |||||
This claw knows Kazing, which will resurrect the other parts without fail, making this your first target, if you're not capable of taking the right claw and left claw out at the same time that is.
Dragon Quest IX[]
| #303 - Mortamor ??? Family | |||||
|
HP | MP | Attack | Defence | Agility |
| ??? | ??? | ??? | ??? | ??? | |
| Exp | Gold | Drop | Multiple | ||
| ??? | 2490 G | ||||
| Description: Stares enemies into a slumber, then clobbers them with a Kafrizz and Kafrizzle. Can be damaged with darkness.
Assesses opponents' strength, then assumes a disguise to suit the situation. No one knows what he really looks like...
| |||||
| Encountered at: | |||||
| Grotto | |||||
| #303 - Mortamor's Left Claw ??? Family | |||||
| File:IX - Mortamor - Left Claw sprite.png | HP | MP | Attack | Defence | Agility |
| ??? | ??? | ??? | ??? | ??? | |
| Exp | Gold | Drop | Minister's mittens | ||
| ??? | N/A G | ||||
| Description: N/A | |||||
| Abilities | |||||
| Normal attack Claw Slash Slap attack | |||||
| Spells | |||||
| Kazing | |||||
| Encountered at: | |||||
| Grotto | |||||
| #303 - Mortamor's Right Claw ??? Family | |||||
| File:IX - Mortamor - Right Claw sprite.png | HP | MP | Attack | Defence | Agility |
| ??? | ??? | ??? | ??? | ??? | |
| Exp | Gold | Drop | Guru's gloves | ||
| ??? | N/A G | ||||
| Description: N/A | |||||
| Abilities | |||||
| Normal attack Claw Slash Slap attack Disruptive Wave | |||||
| Spells | |||||
| Multiheal | |||||
| Encountered at: | |||||
| Grotto | |||||
Mortamor appears as a Legacy Boss, obtained after completing Quest #158 (or received at special events).
Treasure[]
|
Skills[]
|
Battle Strategy
You should have a Priest and/or a Sage in your party. Equip that character with Minstrel's Manual to enable Gritty Ditty. The other three characters can be Warriors and/or Paladins. Equip these with Falcon Blades or Uber Falcon Blades. One of your fighters needs to have learned Fource abilities, equip that character with Armamentalist's Album to use Fources on all party members. Equip your healer and Fource caster with Meteorite Bracers or at least Agility Rings.
1st Turn: Cast Gritty Ditty and Funereal Force on your party while the fighters use Falcon Slash.
2nd Turn: Cast Gritty Ditty a second time and have the 3 fighters using Falcon Slash.
Remaining Turns: Continue to Falcon Slash with fighters. Healer can either attack to drain MP or heal as needed.
If the boss uses Disruptive Wave, start the above steps over.
- Take out his hands first!
Monster Series Appearances[]
Dragon Warrior Monsters[]
| # - DeathMore1 ??? Family | |||||
 |
HP | Wisdom | Attack | Defence | Agility |
| 3/5 | 5/5 | 5/5 | 2/5 | 5/5 | |
| Description: An evil lord that lives between reality & fantasy. | |||||
| Spells and Abilities | |||||
| TatsuCall (Lv. 21) HellBlast (Lv. 35) BigBang (Lv. 37) | |||||
| How to breed: | |||||
| Zoma X Mirudraas1 / Mirudraas2 | |||||
| # - DeathMore2 ??? Family | |||||
 |
HP | Wisdom | Attack | Defence | Agility |
| 3/5 | 5/5 | 5/5 | 2/5 | 5/5 | |
| Description: Shed off its disguise to show off its strength. | |||||
| Spells and Abilities | |||||
| FireAir (Lv. 4) Ramming (Lv. 13) UltraDown (Lv. 22) | |||||
| How to breed: | |||||
| DeathMore1 X Armorpion | |||||
| # - DeathMore3 ??? Family | |||||
 |
HP | Wisdom | Attack | Defence | Agility |
| 3/5 | 5/5 | 5/5 | 3/5 | 5/5 | |
| Description: Only a true warrior can reveal its real identity. | |||||
| Spells and Abilities | |||||
| Focus (Lv. 19) DeMagic (Lv. 21) BigBang (Lv. 37) | |||||
| How to breed: | |||||
| DeathMore2 X Mudou | |||||
Mortamor (DeathMore at the time) is present in all of his forms from Dragon Quest VI, though his hands are part of his final form now and not separate monsters. The player will have to obtain nearly all other members of the boss family to breed all of Mortamor's forms. Mortamor is also the boss behind a gate full of members of the Dragon family that is guarded by an old man and is considered by the residents of GreatTree to be the strongest of the evil lords.
Dragon Warrior Monsters 2[]
Deathmore1 recipe: Mirudraas1 x Azurile, or Zoma x Mirudraas (either form), or Zoma x Azurile
Deathmore2 recipe: Deathmore1 x Titanis, or Deathmore1 x Armorpion
Deathmore 3 recipe: Deathmore2 x DarkMate, or Deathmore2 x Mudou, or Deathmore2 x Poseidon
Dragon Quest Monsters: Joker[]
Mortamor appears as a rank X monster and the last member of the Demon family.
Dragon Quest Monsters: Joker 2[]
An X rank monster in the special family. Armed with magic regenerator plus great MP and wisdom, Mortamor is one of the better X rank mages.
Recipe: Nimzo x Estark
Theatrhythm Dragon Quest[]
Like the other final bosses, Mortamor makes an appearance in Theatrhyhm Dragon Quest. His battle theme is Demon Combat from Dragon Quest VI.
Gallery[]
")
")
")
")
")
")
")
")
")
")
")
Trivia[]
- It is unknown what Mortamor really is, but it's said he is a demon, however, his final defeat shows one of his gold orbs breaking apart, which may be what he really is, since he uses them in his attacks and forme changing.
- Mortamor's conquest of another world or worlds after his own would later spawn other villains in the Dragon Quest series, such as Rhapthorne & Maldragora.
- Mortamor's attempt to take on Nokturnus who threatens to take on his power is similar to Mordegon trying to stop the Dark One from regaining his body.
- However, Mortamor is no match for Nokturnus and loses, while Mordegon shatters Erdwin's Lantern without a boss fight leaving the dark god powerless until the Luminary goes back in time and kills him.
- Mortamor's first form design is based on Master Roshi from Dragon Ball, which Akira Toriyama also worked on.
==Related monsters==*Evil God's Right Hand
- Forbidden Book Guardian
- Pharaoh's right hand
- Pharaoh's left hand
- Nightmare's right hand
- Zelmere, master of spells
Other languages[]
| Other languages | |
| French | Mortamor |
| German | Mortamor Tamuha (M) |
| Spanish | Mortamor |
| Italian | Moltomort |
| Dutch | Unknown |
| Norwegian | Unknown |
| Greek | Unknown |
| Portuguese | Unknown |
| Russian | Unknown |
| Chinese | 德斯㙮穆亞 |
| Korean | 노왕 데스타무아 |
| Bosses in Dragon Quest IX | |||
|---|---|---|---|
| Storyline | Hexagoon · Wight Knight · Morag · Ragin' Contagion · Master of Nu'un · Lleviathan · Garth Goyle · Tyrantula · Grand Lizzier · Larstastnaras · Dreadmaster · Gadrongo · Greygnarl
| ||
| Post-Game Quests | |||
| Grotto bosses | |||
| Zenus | Equinox · Nemean · Shogum · Trauminator · Elusid · Sir Sanguinus · Atlas · Hammibal · Fowleye · Excalipurr | ||
| Legacy bosses | Dragonlord · Malroth · Baramos · Zoma · Psaro the Manslayer · Estark · Nimzo · Murdaw · Mortamor · Nokturnus · Orgodemir · Dhoulmagus · Rhapthorne | ||