![]() This article is a walkthrough.
This article is a walkthrough.
This is part 2 of the entire walkthrough. The following 7 chapters lead you to collect all the seven fyggs in the Protectorate.
Click here to see the Part 1
Chapter 4: Jack of Alltrades, Master of Nu'un
Upon arriving at Newid Isle, Stella will tell you about the blue trees and the nearby town Alltrades Abbey. You can summon Starflight Express at the blue trees, but you don't need them anytime soon. Head to Alltrades Abbey go all the way along the corridor. You will see a cutscene telling you that the abbot is missing. After the cutscene, go to the priest and he will tell you to speak with other people to get more info. Speak with the people around, then go to the lower floor. Talk with the bartender here, and then the martial artist before the inn. From the talkings, you will find out that the abbot ate a golden fruit (the fygg!!) with his lunch, and run to Tower of Trades like crazy after that. Then leave the floor, Stella will prompt you to talk to the ""important-looking guy" (the priest). The priest will then teach you a new party trick "bow". Leave Alltrades Abbey and head east to the Tower of Trades.
Tower of Trades
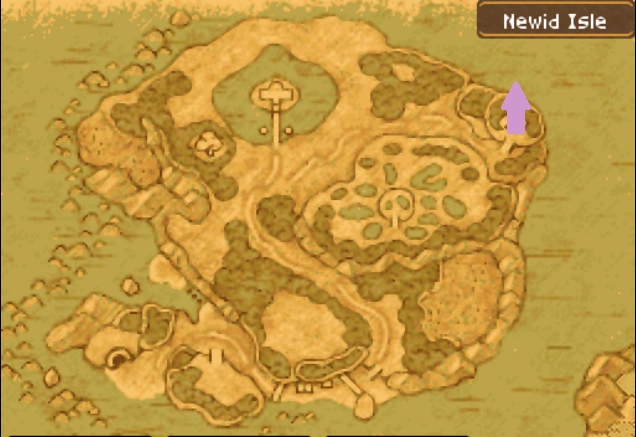
Location of Tower of Trades in Newid Isle (purple arrow))
The door is locked, but will be unlocked when you bow to it. Head toward the 7th level, there is no monster on level 7, so make sure you restore your party members before you enter the room and meet the boss Master of Nu'Un.
| #261 - Master of Nu'un ??? Family | |||||
| File:MasterOfNuun.png | HP | MP | Attack | Defence | Agility |
| 796 | 255 | 80 | 78 | 56 | |
| Exp | Gold | Drop | Lava lump (100%) | ||
| 2904 | 780 G | ||||
| Description: Jack of Alltrades ate a fygg that had fallen from above in a bid to become god-like, but turned into this hideous beast instead. Jack spent some time thinking up his god name, toying with 'High Jack' and 'Jackrilege' before setting on 'Master of Nu'un'.
| |||||
| Encountered at: | |||||
| Tower of Trades top | |||||
After you defeat Master of Nu'Un, Jack will return to Alltrades Abbey, you can visit there anywhere to get your party member change their vocations. Also, there will be 6 more vocations (Gladiator, Armamentalist, Paladin, Ranger, Sage and Luminary) become unlockable by completing their corresponding quest.
Head south to the next town Porth Llaffan
![]() Fygg #1 obtained!
Fygg #1 obtained!
Chapter 5: Jona of Llaffan
If you reach at Porth Llaffan in the morning, you can see that the villagers gather at the coast, watch this girl Jona Jones praying to Lleviathan, and then Lleviathan will splash a good amount of fish to the shore. After the "show", talk to Jona and she will ask you to visit her in the evening. When you get to her house, a boy will came and ask Jona to go to Mayor's house, follow her and see the cutscene in the Mayor's house. After the cutscene, you will automatically return to Jona's house. The next morning, go the the west gate of the town, and talk to the boy there. The boy will mention that Jona went to the Cuddiedig Cliff with the mayor. Go through the gate and head to Tywll Cave - the cave that lead to Cuddiedig Cliff.
If you do not have a Gladiator, the vocation unlockable in Alltrades Abbey, in your party, then the weapons sold here won't do you any good.
Tywll Cave - Cuddiedig Cliff


Location of Tywll Cave in Newid Isle(Blue spot)
Collect a ![]() Seed of Magic at the eastern dent, and a blue chest in the dent next to the cave. After that, head into the cave. There is two entrance on the north of Level 1, ou can head in to collect some items inside, then leave level 1 from the west exit. Again, there will be two entrance for level 2, take the east one to collect a
Seed of Magic at the eastern dent, and a blue chest in the dent next to the cave. After that, head into the cave. There is two entrance on the north of Level 1, ou can head in to collect some items inside, then leave level 1 from the west exit. Again, there will be two entrance for level 2, take the east one to collect a ![]() Seed of Agility, then take te west entrance. Follow the stairs oon the left to get a
Seed of Agility, then take te west entrance. Follow the stairs oon the left to get a ![]() Mini medal, and also a 1500 G on the northern platform. Then head in the exit on the east side of level 2. In the last part of the dungeon, get to the central island, then head west then south, to collect a
Mini medal, and also a 1500 G on the northern platform. Then head in the exit on the east side of level 2. In the last part of the dungeon, get to the central island, then head west then south, to collect a ![]() Blue jeans. Then head through the north exit.
Blue jeans. Then head through the north exit.
On the cliff, you will see another scene with the Mayor and Jona. After the cutscene, the Boss Lleviathan will appear. But the fight will not be engaged until you talk to it, so you have time to zoom back to the town to restore, re-quip or revive any party member before you face it. When you are ready, talk to Lleviathan to start the fight.
Lleviathan is a huge whale-like monster, and i uses a lot of all-range damage attacks, so watch your HP and have your priest to restore when needed.
| #262 - Lleviathan Aquatic Family | |||||
| File:Lleviathan.png | HP | MP | Attack | Defence | Agility |
| 1256 | 32 | 110 | 90 | 36 | |
| Exp | Gold | Drop | |||
| 4134 | 960 G | ||||
| Description: The people of Porth Llaffan worshipped this watery deity, which was really Dylan Jones in fygg-changed form. He once swam with countless companions in the seas around Newid Isle, but Lleviathan is now sadly one of the last of his kind.
| |||||
| Encountered at: | |||||
| Tywll Cave - Cuddiedig cliff. | |||||
After the fight, you will get the second Fygg, and now the port in the town will be working now, so talk to the sailor on the ferry to get to the next destination - Slurry Quay. But it is recommended to take a rest in the inn in Porth Llaffan first.
![]() Fygg #2 obtained!
Fygg #2 obtained!
Chapter 6: How High is Loneliness?
Slurry Quay, Dourbridge and Lonely Plains
When you reach at Slurry Quay, the sailor will tell you that they can only take you to here, if you want to get to somewhere else, you need to head to Bloomingdale to get a ship. There is not much to do in Slurry Quay, the inn cost 6 G per person here, unlike in Porth Llaffan t only cost 5 G per person. This is really expensive for such a small port like Slurry Quay. Grab the chest behind the merchant, and leave from the east exit, and head south. If you go o the far south of Slurry Coast, you can get to Bloomingdale region, but you can't get to the town because the mountains blocked your way. However, here is a harvest point of an alchemy ingredient - ![]() Nectar. Back to Slurry Coast, and head to Dourbridge town, located about midway east of Slurry Coast.
Nectar. Back to Slurry Coast, and head to Dourbridge town, located about midway east of Slurry Coast.
Prepare yourself at Dourbridge, accept some quests if you want (or if you have space), then leave from the east exit. Head straight south to the next region Lonely Plains. There is no town or village here for you to Zoom for rest, so it is recommended that you head west to visit Bloomingdale, which is a better town to Zoom than Dourbridge. Because if you zoom to Dourbridge, you will land at Slurry Coast, and take longer to travel back to Heights of Loneliness.
Note this enemy that haunts from Dourbridge all the way to Heights of Loneliness:
| #074 - Toxic zombie Zombie Family | |||||

|
HP | MP | Attack | Defence | Agility |
| 150 | 10 | 82 | 35 | 32 | |
| Exp | Gold | Drop | |||
| 270 | 100 G | ||||
| Note: Attacks carry poison, be sure you have enough antidote or a priest in your party.
| |||||
Heights of Loneliness
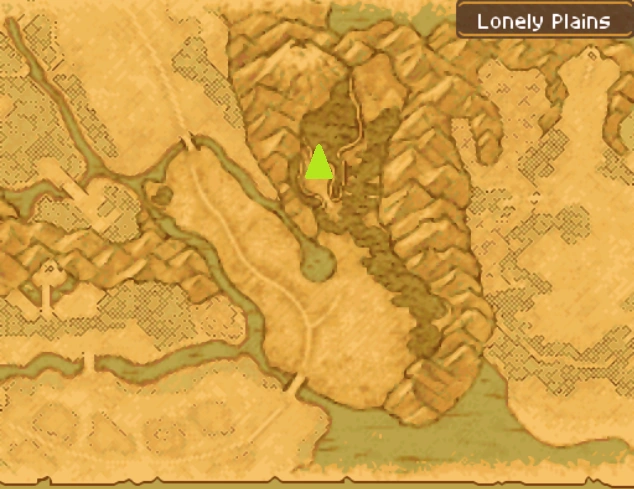

Location of Heights of Loneliness at Lonely Plains (green triangle)
At the entrance, you can get a quest that unlock the Ranger vocation.
Get into the cave, head west first to collect a ![]() Mini medal, then head north to get to level 2. You can see a stair case on northeast corner, but it is broken, so you need to go northwest, climb up the platform, and walk across the vine bridges, your next exit is on the west-most platform.
Mini medal, then head north to get to level 2. You can see a stair case on northeast corner, but it is broken, so you need to go northwest, climb up the platform, and walk across the vine bridges, your next exit is on the west-most platform.
At level 3, first walk along the slope, and enter the cave on the second level, climb along the stairs until you get back to Level 3. Now, you will be on a cliff, collect the item ![]() kitty litter, then backtrack to the cave. Continue along the slope until you get across the bridge, climb the ladder, then walk along the vine bridge again. Leave from the north exit to Level 6.
kitty litter, then backtrack to the cave. Continue along the slope until you get across the bridge, climb the ladder, then walk along the vine bridge again. Leave from the north exit to Level 6.
Go west to the stair case, and then south to get to outside of Level 7. Wind up along the slope, and talk to the guy lying on the crumbled staircase. He will give you a quest, and if you have a ![]() Special medicine in your bag, you can get your first treasure map from him.
Special medicine in your bag, you can get your first treasure map from him.
Continue to go north, you will get to Zere Rocks. This is a place where you can zoom to, so you can zoom to another town to restore before you face the Boss. When you are ready, talk to the slime inside the northeast house to trigger the fight with the Boss.
| #263 - Garth Goyle Material Family | |||||
| File:GarthGoyle.png | HP | MP | Attack | Defence | Agility |
| 1054 | 255 | 120 | 125 | 66 | |
| Exp | Gold | Drop | |||
| 4134 | 1250 G | ||||
| Description: This stone sentry was created to stand guard over Zere Rocks. It seems to be looking for someone called Mason... Having lost its granite guardian, the statuesque town of Zere Rocks will surely now crumble into dust and blow away...
| |||||
| Encountered at: | |||||
| Heights of Loneliness - Zere Rocks | |||||
After defeating the Garth Goyle, head to the basement beside the house, and Mason will hand in your third Fygg.
![]() Fygg #3 obtained!
Fygg #3 obtained!
Now zoom to Bloomingdale if you have visited as recommended in the start of this chapter. Or cast Evac to get to the base of Heights of Loneliness and head west.
Chapter 7: One True Friend
Bloomingdale: Time to get a Ship
Arriving at Bloomingdale, you will notice that there are 2 armor shops. The one in the same block as the church sells only footwear, it is also the Toymaker's house. (Keep note this because you need to come here later. ) Head northwest to the harbor, and see a big, beautiful, marvelous, luxury,.........ship. Talk to the ship's warden, the old man in front of the ship, and learn that if you want the ship, you need to ask Ms. Marion Bloom, the generous girl who live in the mansion at the north of the town. Head to the mansion, and approach the room to the east, you will see a cutscene of Ms. Marion Bloom, when you talk to her, she will suddenly get enraged and drive everyone out. Get out of the mansion, a girl will tell you that Ms. Bloom's nanny live in the house next to the mansion. Visit the nanny, and she will tell you that only the toymaker can calm Ms. Bloom down. Visit the toymaker, and he will take you to the mansion, mentioning that he made a doll name Marionette for Ms. Bloom. The toymaker went all the way to the mansion, only to find that Ms. Bloom was kidnapped by some thugs. The toymaker ran out and shout to everyone. A ghost will appear in the room, saying that she is the real Marion Bloom. The cutscene will tell the story with Marion and her substitute. Marion will ask you to save the kidnapped girl. According to the note left by the kidnapper, they are in the cave located north of the town.
Leave the town and head north to The Bad Cave. Note this enemy on your way:
| #090 - King slime Slime Family | |||||

|
HP | MP | Attack | Defence | Agility |
| 245 | 32 | 136 | 95 | 75 | |
| Exp | Gold | Drop | |||
| 600 | 164 G | ||||
| Note: Appear as 8 normal slimes when encountered, if anyone is defeated, a substitute will be summoned. If there is no slime missing, they will form King slime in the next turn.
| |||||
The Bad Cave: the Kidnap
From the entrance of the dungeon, head straight north into the cave, follow the path until you see a set of table and chairs. Check on the table and the kidnapper will show up. (Also set up a ladder for you.) While talking, the other kidnapper will show up saying that the girl is missing. After the kidnappers left, climb down the ladder and head inside the cave. The kidnappers will provide you with a good deal of loots :D. Take the northeast path go along the path until you see a fork. Take the east path first to collect a ![]() Hephaestus' flame. Then head back and take the west path. Follow the path in and out until you see another fork, head east first to open a blue chest. Then head west to the next scene.
Hephaestus' flame. Then head back and take the west path. Follow the path in and out until you see another fork, head east first to open a blue chest. Then head west to the next scene.
You will see another fork, head north to collect a ![]() mini medal, return to the fork and head south, jump across the stones, and climb above the north platforms to open a blue chest. Another 1700 G on the northernmost platform. Collect all chest and leave from the west exit. Follow the path to another fork, ignore the east one and head west until you see the girl. Approach her to see a cutscene, and then followed by a Boss fight!
mini medal, return to the fork and head south, jump across the stones, and climb above the north platforms to open a blue chest. Another 1700 G on the northernmost platform. Collect all chest and leave from the west exit. Follow the path to another fork, ignore the east one and head west until you see the girl. Approach her to see a cutscene, and then followed by a Boss fight!
| #264 - Tyrantula Bug Family | |||||
| File:Tyrantula.png | HP | MP | Attack | Defence | Agility |
| 1098 | 36 | 100 | 154 | 96 | |
| Exp | Gold | Drop | |||
| 5231 | 1500 G | ||||
| Description: An enormous arachnid who dwelt deep in the Bad Cave, soaking up poison and perniciousness until she morphed into a man-eater. It is said that she made meals of travellers lost in her cave to feed her clutch of countless eggs.
| |||||
| Encountered at: | |||||
| Bloomingdale region - The Bad Cave | |||||
After defeating Tyrantula and see the cutscene, return to Bloomingdale, go straight to Marion's mansion, and find Marionette before her grave, after another cutscene, you can go to the ship's warden to get the ship.
Now, if you cast Zoom or use Chimera wing, your ship will automatically dock at the nearest coast, so don't be afraid that you will lost your ship.
![]() Fygg #4 obtained!
Fygg #4 obtained!
Now zoom to Slurry Quay, and set sail from there to Djust Desert.
Chapter 8: Deserted
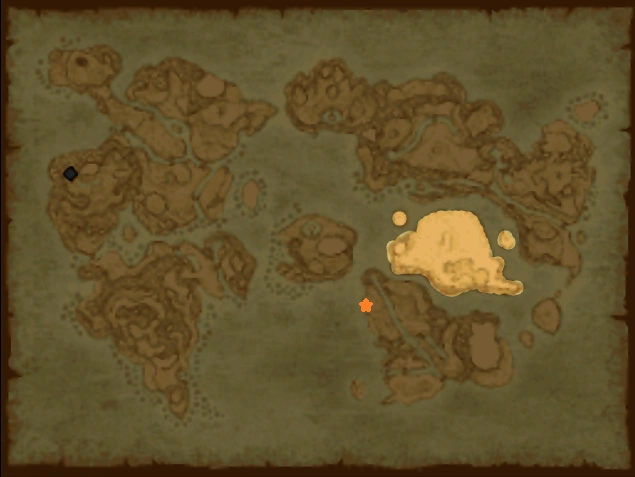
Slurry Quay (Orange star) and Djust Desert (unshaded region)
Start from Slurry Quay, sail north around the continent, and land on the north coast of Djust Desert's main island (see map on the left). Embark on the north so it is nearer to the destination in next chapter. If you want, you can sail around the ocean to visit Pluvi Isle to receive a quest, or visit Wormwood Creek due west of Porth Llaffan, however, no shop here (except the Inn) will provide service.
Djust Desert and Gleeba
Gleeba is the town located in the center of the desert. Visit it and talk to the villagers here. You will find out that Queen Voluptua use all water from the waterway to build her private bathing chamber. So head to the castle: Mirage Mahal. The guard won't let you enter the bath chamber, so you need to go upstairs to talk to the butler around the throne. He will ask you to find the queen's pet lizard, then he will take you to see the queen.
Head to the door of the bath chamber again to speak with the purple-haired girl Misslei, she will tell you the habits of the lizard. Now go outside the castle, and head west. Use party trick "clap" around the coconut tree, and the lizard will appear. He will run around in a 8-looking path, just stand in the way, you can catch it easily. Take the lizard to Misslei and the butler, a cutscene with the queen will show. After that, go to the third floor, remember to collect an important item ![]() Magic Key through the northern entrance of the floor. Magic key can be used to unlock doors that look like this:
Magic Key through the northern entrance of the floor. Magic key can be used to unlock doors that look like this:
![]()
After collecting the magic key, talk to the man fishing in the pool, he will tell you a secret path to enter the queen's bathing chamber. Check the pool near the man to get to the bathing chamber. After the cutscene, check the well at northwest corner of the bathing chamber to get to The Plumbed Depths.
The Plumbed Depths
From the entrance, go straight along the path, and into a room, leave the room from the south exit, walk down the stairs to collect a ![]() Enchanted stone, then follow the path west of the room to get to a prison. The doors are lock here so you can't get anything yet. Take the west stairs to get to a graveyard. There is a
Enchanted stone, then follow the path west of the room to get to a prison. The doors are lock here so you can't get anything yet. Take the west stairs to get to a graveyard. There is a ![]() Mythril ore for you to collect. Backtrack to the room, this time, go east across the bridge and down the stairs. Go along the path then climb the ladder to find another stair case that leads to B2.
Mythril ore for you to collect. Backtrack to the room, this time, go east across the bridge and down the stairs. Go along the path then climb the ladder to find another stair case that leads to B2.
From the staircase, if you take the southeast path and wind clockwise, you will find some barrels, you might find an ![]() Ice crystal here or some medicinal herb that does you hardly any good now.
Ice crystal here or some medicinal herb that does you hardly any good now.
So take the bridge on the northeast and wind anti-clockwise until you get to the lower level. Pass through the tunnel and continue to wind anti-clockwise. When you see the fork, head west to collect a ![]() Mini medal, then head to the well. There is a
Mini medal, then head to the well. There is a ![]() Magic shield you can get on the northernmost dent, so take it and equip it before you head down the well.
Magic shield you can get on the northernmost dent, so take it and equip it before you head down the well.
Level 3 is a room that look similar to a Mickey mouse (LOL), wind anti-clockwise to face the Boss. Remember to restore and check equipment on the "right ear of Mickey mouse" before you continue to face the boss.
| #265 - Grand Lizzier Dragon Family | |||||
| File:GrandLizzier.png | HP | MP | Attack | Defence | Agility |
| 1276 | 40 | 200 | 158 | 85 | |
| Exp | Gold | Drop | |||
| 6200 | 1750 G | ||||
| Description: They fygg-altered form of the Queen of Gleeba's little lizard pal, who turn out held a torch for his mistress all along. He thought that eating a fygg would turn him into a mortal, but it only moved him up a short rung on the evolutionary ladder.
| |||||
| Encountered at: | |||||
| Gleeba - Mirage Mahal - The Plumbed Depths | |||||
After the fight , you will get the 5th Fygg.
![]() Fygg #5 obtained!
Fygg #5 obtained!
After the cutscene, back to your ship and sail north to embark on the continent. You will be in Urdus Marshland.
Chapter 9: Prince of the Plain
Batsureg the Nomadic Town
Head north of Urdus Marshland to get to the next region Iluugazar Plains. In the center of the plain, you can find the nomadic town, Batsureg. Go to the largest yurt on the hill, see the cutscene, ad the king will ask you to go to Hunters' Yurts to the north of the town to find his prince, Batzorig. Hunters' Yurts is a small settlement with only two yurts. When you approach the north yurt, you can hear the prince arguing with his people. After the scene, go to the south yurt to talk with the prince. After the talk, the prince will run away. The villagers will tell you that the prince head north across the bridge. Follow the prince to the next region Mt. Ulbaruun, you will see him running west, so fallowing him until you reach a graveyard on the west end of the mountain range. After a talk with the prince, a ghost, Baryaama, will appear and ask you to go to the abandoned town, Gerzuun, to collect the Bodura grass, which can help the prince.
Gerzuun the Abandoned Village
Gerzuun located in the north section of Mt. Ulzuun, which is accessible from the east of Mt. Ulbaruun. Gerzuun is a easy dungeon, first take the stairs a little west of the entrance to the basement, and collect a ![]() Sober ring and a
Sober ring and a ![]() Hephaestus' flame. The other doors are locked, so you can't get to the chests yet. Return to the ruin, wind anti-clockwise to the north side, then head south to collect the four chests. Finally head into the cave. There will be no monsters beyond this point, not even a boss. Go straight north and take the stairs, then south to the lake to collect the Bodura grass. Head back to the Hunters' Yurts and into the south yurt, give the prince Bodura grass, then head back to Batsureg. Restore and save, then head to the platform before the King's yurt, and face the boss after the cutscene.
Hephaestus' flame. The other doors are locked, so you can't get to the chests yet. Return to the ruin, wind anti-clockwise to the north side, then head south to collect the four chests. Finally head into the cave. There will be no monsters beyond this point, not even a boss. Go straight north and take the stairs, then south to the lake to collect the Bodura grass. Head back to the Hunters' Yurts and into the south yurt, give the prince Bodura grass, then head back to Batsureg. Restore and save, then head to the platform before the King's yurt, and face the boss after the cutscene.
| #266 - Larstastnaras Demon Family | |||||
| File:Larstastnaras.png | HP | MP | Attack | Defence | Agility |
| 1562 | 255 | 140 | 150 | 95 | |
| Exp | Gold | Drop | |||
| 8200 | 2000 G | ||||
| Description: The true form of Sarantsatsral, the wicked witch who tried to take control of the plains by bending Batkhaan's ear. | |||||
| Spells | |||||
| Boom | |||||
| Encountered at: | |||||
| Iluugazar Plains - Batsureg | |||||
After defeating the boss and enjoy the cutscene, you can get the sixth Fygg.
![]() Fygg #6 obtained!
Fygg #6 obtained!
Go to Baryaama's graveyard again, you can receive a ![]() Spirit bracer from her.
Spirit bracer from her.
Chapter 10: Old School
Starting from Iluugazar Plains, head back south to Urdus Marshland, then head east into Hermany. Go all the way to the eastern coast, and head north into Snowberian Coast, Snowberia, until you get to the town/school in the middle of Snowberia -- the Swinedimples Academy.
Swinedimples Academy
Upon reaching the academy, the headmaster will mistaken you as the investigator who should come here to find out why students are missing from the academy. He will take you to the office, give you 1000 G and a uniform (in fact an equipment) as disguise. After that, go to the dormitory (the east building), your room is the one on the southwest corner, you can rest at the bed for free. You will see three students, leading by one named Fred, talking about the ghost of the academy. After the cutscene, leave the building, the bell for class will ring. All students will run into the academy, and the gate will be locked. If you talk to the teacher at the gate, he will tell you some students (Fred's gang) did not show up. Find them in the corner west of the assembly hall, talk to them and agree to join them, and he will tell you about the statue on 3F.
Go to 3F at night and check the statue, Fred will appear, followed by a ghost. The ghost will take Fred away, follow them to the gravestone east of the main building, and a hidden staircase will show up. Follow them into The Old School.
The Old School
From the entrance, don't go along the corridor, get in the library and head north. Climb up the book stacks to walk above the shelves. Go to the east side, and collect a blue chest on the south, before going to the north section, climb down the ladder and head north room. Wind clockwise (watch the poison puddle) to collect a ![]() Brainy bracer. Back to the ladder, head north, wind clockwise again then down the shelves from the book stacks. Get to the next level from the staircase.
Brainy bracer. Back to the ladder, head north, wind clockwise again then down the shelves from the book stacks. Get to the next level from the staircase.
Note these monsters who might cause deadly hits:
|
| ||||||||||||||||||||||||||||||||||||||||||||||||||||||||||
Enter the room can collect a ![]() einhander at the southeast corner, then head west and south to the next section. There will be a pot blocking the way, just break it. If you are lucky you can find some item inside. Continue to head south until you get to the door in the corner. Enter the room to see a cutscene, and Boss fight:
einhander at the southeast corner, then head west and south to the next section. There will be a pot blocking the way, just break it. If you are lucky you can find some item inside. Continue to head south until you get to the door in the corner. Enter the room to see a cutscene, and Boss fight:
| #267 - Dreadmaster Humanoid Family | |||||
| File:Dreadmaster.png | HP | MP | Attack | Defence | Agility |
| 1680 | 255 | 160 | 170 | 125 | |
| Exp | Gold | Drop | |||
| 10000 | 2550 G | ||||
| Description: Harsh master of old-fashioned teaching techniques who held his extra-curricular sessions in the basement of Swinedimples. He built his academy in the wintry wasteland to toughen up his pupils. The cheap land prices didn't hurt, either... | |||||
| Spells | |||||
| Zammie, Crackle | |||||
| Encountered at: | |||||
| Swinedimples Academy - The Old School | |||||
Collect the last Fygg after the fight.
![]() Fygg #7 obtained!
Fygg #7 obtained!
The headmaster will give you 3000 G more as reward. After defeating the Dreadmaster, quests will be available in this town. Most of them require your party members to masker a skill to a certain level.
Wen you approach the gate, the real investigator will finally appear, but he was thought to be a fraud and was carried out of the town.
With all seven fyggs collected , Stella will prompt you to return to the blue tree in Newid Isle near the Alltrades Abbey. So zoom them to summon the Starflight Express.