![]() This article is a walkthrough.
This article is a walkthrough.
Also see:
Some tricks
- Don't spend too much money on Chimera wings and Evac-u-bells, because the Hero will learn Zoom and Evac later.
- When you get to a new area, go to the town/village before you explore the rest of the region. This way you can Zoom to the village whenever you need.
- Part of the story only happens in a special time period, when this occurs:
- In the daytime, you can select the option "Rest" to switch to Evening.
- In the evening or night time, select "Stay overnight" to switch to Daytime.
- After Chapter 7, you will gain a ship. If you cast Zoom or use Chimera wing, your ship will automatically dock at the nearest coast, so don't be afraid that you will lose your ship.
- If you see poisonous purple puddles on the floor, don't step on them because they will decrease your HP. Cast "Safe Passage" if your party members have learned it. It lasts until you get to another scene.
Prologue
When the game starts, the Hero has his/her first battle with Aquila. After the battle, the Hero will return to the Observatory with Aquila.
Go to the northernmost room of Level 1 to save your progress. There are a few items in other rooms, remember to collect them. Go to the stairs at the center of level 1 to enter level 2 of the Observatory. You can go northeast to see Aquila who is talking with Columba about Apus Major's decision. Leave the room and go north to speak with Apus Major. Apus Major will send the hero to offer the collected Benevolessences to the Great World Tree Yggdrasil. Leave from the south exit to the Observatory L1-L2. There is 1 chest in the northwest corner, and 2 chests in the northeast corner of this level. Collect those items and go to the stairs at the center of the level, then speak with the guard to get permission to pass the stairs that lead to Level 3. Go up the stairs and continue to go north until you get to Observatory L4. At the top of Level 4 is the Yggdrasil. Check the Yggdrasil to offer the collected Benevolessences. After a cutscene with Aquila, go back to Apus Major. Apus Major will send the hero to collect more Benevolessences, head to Level 1 and talk to the female beside the portal to go to Angel Falls.
When the Hero returns to Angel Falls to collect Benevolessences, the cutscene shows Ivor and Hugo talking about the names of the Guardian Statue. Ivor believes that it used to be "Aqui-" something (which referred to Aquila, the last guardian angel of Angel Falls), but most people believe that it is the name of the Hero.
Two quests need to be completed before the story continues. However you can collect some items around the village before finishing the quests. The first one is to collect the Horse Manure in the stable. After you collected all of them, the farmer will wake up and give gratitude to you (one Benevolessence obtained). The second quest, there is a lady praying to find her husband's ring. Go to the east side of the village where the shop is; there will be a dog who shows you where the ring is. Take the Keepsake ring you found to the lady and she will give gratitude to you (another Benevolessence obtained).
When you leave the church, the time will turn to night. Head east and you will see Aquila in the center of the village. He will tell you that not only do the guardian angels need to watch over the living people, but also the dead whose souls still roam the land. There is a soul at the east side of the bridge. Talk to the soul and he will realize that he is dead. The soul will leave and leave a Benevolessence for the Hero. Collect it and talk to Aquila to return to the Observatory.
Immediately south of the portal on level 1, there is a hidden door that leads to a room with a chest. Grab the seed of life from there before making your way to the Yggdrasil tree, where you watch a cutscene in which you fall out of the Observatory and land back in Angel Falls.
Chapter 1: The Angel falls
Now that your hero has lost his/her halo and wings, you are considered by the villagers as a minstrel that fell from the top of the Angel Falls, who happens to have the same name as their guardian. After the cutscene, speak with all NPC's in the village and finally go to the mayor's house, which is situated at the northwest corner of the village. After a short cutscene with the mayor scolding his son, Ivor, leave the house and the time will turn to night. Return to Erinn's house (the easternmost one, north of the well) and talk to Erinn. She has prepared the meal, and after the meal, she will offer you to take a rest.
The next day, Erinn will wake you up and tell you that Ivor is waiting for you outside. Exit the house and talk to him. Ivor will mention that he wants to go with you to the Mountain pass to clear the landslide, so that the villagers will see him has a hero. Prepare yourself and leave the village from the south exit. Ivor will temporarily join your party, so take this chance to get your levels up while you have an extra party member. Because after this, you will fight by yourself until you get to Stornway.
Go all the way to the east of the greater map to reach Mountain pass. There are no monsters here, so you can wander around here safely. You will come to a fork in the road. In the center fork, your hero will see a section of Starflight Express, but Ivor can't see it. In the right fork, you will find a chest. In the left fork, you will come to the landslide. There will be some soldiers from Stornway who are looking for a missing lady at the other side of the road. They will ask you to pass the message to the villager to find the missing lady, Patty.
Return to the village and report to the mayor. The mayor is not happy with Ivor's deed and will scold him. Erinn learns of Patty during this scene. After the scolding, go to Erinn's house and she will ask you to find the missing lady, Patty, who might be in the Hexagon according to the soldiers from Stornway. Speak to Erinn again (you may have to leave and re-enter the house) to rest there and prepare yourself. DO NOT buy the Leather Shield because you will get a free one in the Hexagon; spend your money on recovery items.
The Hexagon
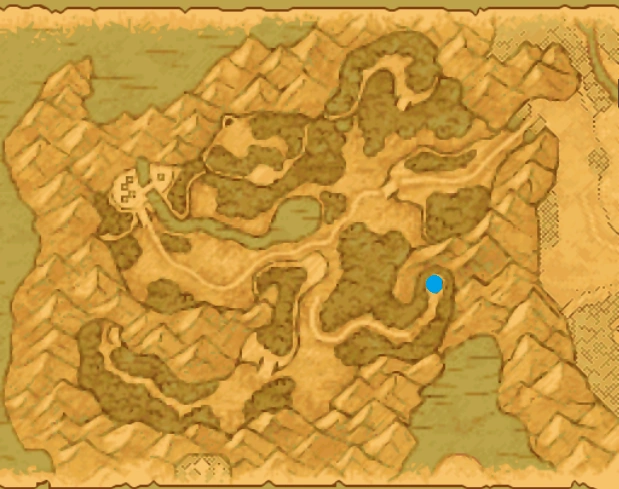
The location of the Hexagon (Blue spot))
After entering the Hexagon, go straight north until you see a tablet. Check the tablet, and a ghost will appear and show you the switch to open the doorway. The switch is located at the back of the statue situated at the left fork. Turn on the switch, go back to the central passage and continue through the opened door. Go to the right fork to collect a Leather Shield. Go back to the two stairways and take the left staircase to collect a Golden Ring. Finally, take the right staircase to go to the Hexagon B1. Go straight to the north and go down the staircase.
At the Hexagon B2, go south to collect some coins from the chest then head northwest first to collect a Feather Fan. After this, head northeast to go to the Hexagon B1 (second part). Go anti-clockwise around the floor and collect a Gleenban Groat, then pass through the north door to the next room. Go northwest first to collect a Seed of Deftness. Finally go to the central room. Before talking with the blue-haired lady, restore the hero's HP because you will be facing the first boss in the game -- Hexagoon.
| #257 - Hexagoon Beast Family | ||||||||||||||||||||||||||||||||||||||||||||||||||||||||||||||||||||

|
HP | MP | Attack | Defence | Agility | |||||||||||||||||||||||||||||||||||||||||||||||||||||||||||||||
| 93 | 18 | 30 | 22 | 11 | ||||||||||||||||||||||||||||||||||||||||||||||||||||||||||||||||
| Exp | Gold | Drop | ||||||||||||||||||||||||||||||||||||||||||||||||||||||||||||||||||
| 175 | 100 G | |||||||||||||||||||||||||||||||||||||||||||||||||||||||||||||||||||
| Description: Hideous hulk that once prowled the passage of the Hexagon, preying on travellers. The earth shakes with its every step.
Its diet consists mainly of rocks and boulders, and it loves dark places, so the Hexagon made a marvellous home.
| ||||||||||||||||||||||||||||||||||||||||||||||||||||||||||||||||||||
| Encountered at: | ||||||||||||||||||||||||||||||||||||||||||||||||||||||||||||||||||||
| The Hexagon - B1 | ||||||||||||||||||||||||||||||||||||||||||||||||||||||||||||||||||||
| ||||||||||||||||||||||||||||||||||||||||||||||||||||||||||||||||||||
Back to Angel Falls
After the battle and the cutscene, you will be automatically transferred to the entrance.
Note that there was a chest at the north corridor where you fought the Hexagoon, but is not accessible because of the rubble. That room is accessible through the entrance at West Stornway.
When you return from the Hexagon go straight to Erinn's inn. After the cutscene, go to Erinn's house and you will see Edwinn, Erinn's deceased father, the same ghost you met in the Hexagon. He is standing outside the front door of her house. Talk to him and Stella, the spirit that is in charge of the Starflight Express, will appear, and wonder why you, appearing to be a mortal, can see the Starflight Express as well as a ghost. Stella would want you to prove your identity as a Celestrian by helping Edwinn. Edwinn will show that he hid something on the hill behind the inn. Go to the hill and find the Inny of Edwinn and show it to Erinn. Erinn will then believe Patty's story and agree to her offer of taking care of her inn in Stornway. Seeing this, Edwinn says that he has no regret and leaves. Stella, on the other hand, starts to doubt whether your hero is a Celestrian again because your hero cannot see the Benevolessence left by Edwinn.
After the cutscene, your first quest will be available.
| Quest #001 - "One Good Turn" | |
|---|---|
| Location | Angel Falls |
| Available at | After defeating Hexagoon |
| Requested by | Questelle |
| Response to | Questelle |
| Requirement | |
| Reward | Sleeping Hibiscus |
| Detail | You've been asked by a girl called Questelle in Angel Falls to go and find a Tangleweb. Try investigating the big spider's web on the other side of the river just outside the village. Keep your eyes peeled for something twinkly... |
| Hint for solution | Tangleweb at the giant cobweb outside of the village. (See the map below.) 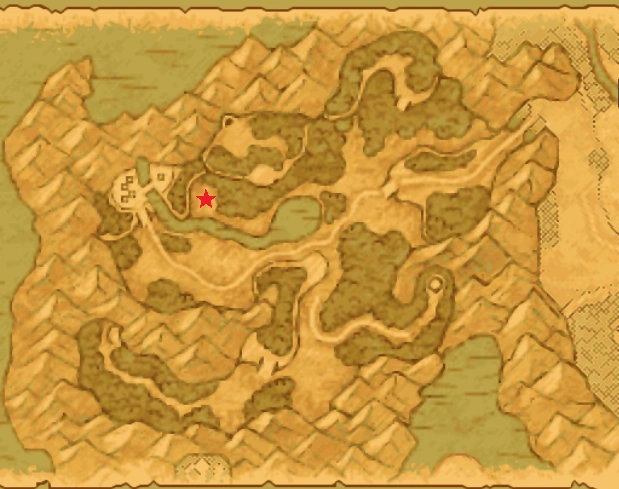  Location of Tangleweb (red star) |
Return to the Mountain pass again. This time, you can enter the Starflight Express. But Stella cannot start the train, so she suggests that you collect more Benevolessence at Stornway and see if the train can start.
Chapter 2: Wight Knight and the Princess
Stornway
Follow the left fork where the rubble used to be to exit the Mountain pass. You will be in Western Stornway. Remember to go southwest into The Hexagon to pick up a ![]() Scale Armor.
Scale Armor.
Enter the town, and visit the inn (see main article Quester's Rest for details) to have a chat with Erinn and Patty. Now you can customize your own party. By talking to Patty, you can add party members, and you can create them just as you did when you created your hero. Also, the one (and only) bank in the game will now be available to you in the inn. They only accept gold in increments of 1000.
After the cutscene, check the sign in the town square. You will find out that the town is now been terrorized by Wight Knight, who came here for the princess. Go north to enter the Stornway Castle. Note that the castle will only be open in daytime. There will be some new quests (see Quest in Stornway) for you to accept, but some of them are not that easy to complete at this point.
Go to the second floor and talk with King Schott. He will tell you to slay the Wight Knight at Loch Storn. Leave the town and head north into the Zere region. Head north (and a little east) to enter Loch Storn.
Loch Storn
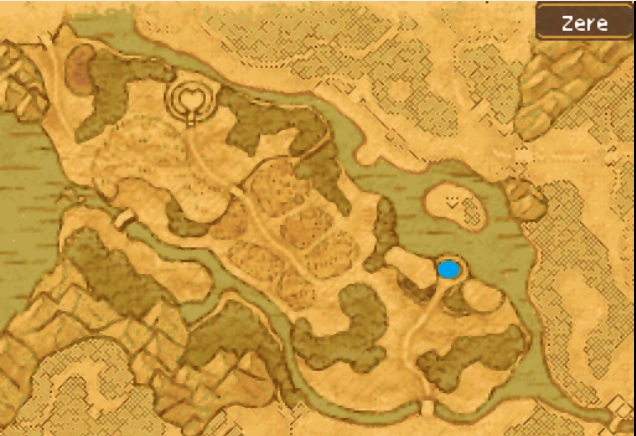

Location of Loch Storn in Zere
Arriving at Loch Storn, Stella will appear and chat with you. She asks if you should wait; accept to wait until night time, and the Wight Knight will appear, looking for his princess, but none to be found.
| #258 - Wight Knight Zombie Family | |||||
| File:WightKnight.png | HP | MP | Attack | Defence | Agility |
| 296 | 255 | 53 | 50 | 45 | |
| Exp | Gold | Drop | |||
| 800 | 200 G | ||||
| Description: Black-clad knight errant who once terrorised the people of Stornway in mistaken search of his long-lost love. He was actually once a handsome young chevalier whose fair face set hearts aflutter in the castle. | |||||
| Spells | |||||
| Heal | |||||
| Encountered at: | |||||
| Zere region - Loch Storn | |||||
Zere Village
According to the princess, one of her old nurse is living at Zere now, she used to sing a rhyme to the princess, and a Brigadoom was mentioned. The princess asks you to visit her and see if you can find more about Wight Knight.
Princess's old nurse live at the house that located at the northeast corner of the village, go there and she will sing a song to you. When you leave the village, you will run across Wight Knight chasing a man. Stop him and tell him what you found, and he will head to Brigadoom.
Doomingale Forest and Brigadoom
After you leave Zere village, head northwest into Doomingale Forest. Brigadoom is in the center of Doomingale Forest. Brigadoom is a dungeon, see HERE for the map. When you get to the throne room in level 2, you will face the Boss Morag.
| #259 - Morag Demon Family | |||||
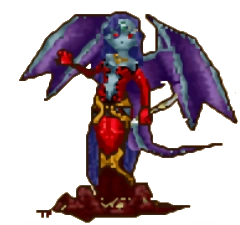
|
HP | MP | Attack | Defence | Agility |
| 456 | 255 | 56 | 58 | 54 | |
| Exp | Gold | Drop | High heels (100%) | ||
| 1600 | 350 G | ||||
| Description: Came to bring destruction to Brigadoom, but was rather taken with the Wight Knight, so sealed herself away with him instead. She chose to bring gloom to Brigadoom for reasons related to the darkest parts of the heart. | |||||
| Spells | |||||
| Crack | |||||
| Encountered at: | |||||
| Brigadoom | |||||
After defeating Morag, princess Simona will appear and calm Wight Knight , and he will finally rest in peace. This means you can finally go to Stornway Castle to collect your reward!
After the cutscene with King Schott, the treasury will be unlocked, and you can access it through the staircases behind the thrones. Go in and collect you....loot ?
Go to Quester's Rest and Erinn will tell you that she found a strange pot, Krak Pot will now be place on the counter, and you can use Alchemy through it to merge and create items/equipments now!
Now return to Starflight Express, the train still can't start, but does give some reaction. Stella says that it might work if you collect more Benevolessence. Now head to Coffinwell through the checkpoint at northeast of Stornway. Note that there are some new quest available, remember to accept them.
Chapter 3: Coughing in Coffinwell
Passing through the checkpoint, you will be in Eastern Coffinwell. Enter the town and head to the highest house (literally) which is the Mayor's house. You will find him on the second floor. He will tell you about this disease in the town, and that Dr. Phlegming is looking for a cure of the disease. Visit Dr. Phlegming's house to find out his progress. His house is the house due west of the Mayor's. You will find a girl, Catarrhina, Dr. Phlegming's wife and the mayor's daughter lying on the bed. Talk to she and she will take you to Dr. Phlegming's laboratory. You can find a good many alchemy recipes in here. After talking to the doctor, report back to the mayor, and he will give you the key to Quarantomb. Go to Dr. Phlegming again, and then leave the town. Head west into the next region, Quarantomb is located to the north of Western Coffinwell.
The Sealed Curse in Quarantomb
Quarantomb is a simple dungeon, just head east and west to turn on the two light beams, the door in the center will be unlocked.
Note this enemy:
| #046 - Metal Slime Slime Family | |||||

|
HP | MP | Attack | Defence | Agility |
| 4 | 255 | 35 | 256 | 89 | |
| Exp | Gold | Drop | |||
| 4096 | 20 G | ||||
| Note: Give high experience and has high defense. It has a low rate of appearance a high rate of escaping. So it is hard for you to kill with normal attacks. If you have a thief in your party, equip him/her with
| |||||
| Haunts at: | |||||
| Quarantomb | |||||
When you enter the central room, check the jar on the platform and the boss will attack after the cutscene.
| #260 - Ragin' Contagion Elemental Family | |||||
| File:RaginContagion.png | HP | MP | Attack | Defence | Agility |
| 696 | 255 | 68 | 68 | 50 | |
| Exp | Gold | Drop | |||
| 2295 | 600 G | ||||
| Description: The very essence of illness, it was sealed up in the Quarantomb for a century, but came back to curse Coffinwell once more. This toxic pox was created to ensure that the nameless terror that slept in the Quarantomb stayed sealed inside forever.
| |||||
| Encountered at: | |||||
| Western Coffinwell region - Quarantomb | |||||
A Grievous Loss
Returning to Coffinwell, you can see that everyone are well now. Go to the Mayor's house, he will want yo to tell Catarrhina the good new. When you go to Dr. Phlegming;s house, and you will see her lying on the bed again. Talk with her, and wait for the cutscene. You will find out that someone still died in this contagion. The villagers will gather at the graveyard, after the funeral, wait until nighttime (or go to the inn and choose "rest"), then go to Mayor's house to collect the reward ![]() Feather Headband. Then come back to the graveyard. You will find the ghost of the deceased patient. She will ask you to visit Dr. Phlegming's laboratory. Talk with him and he will suggest to visit all the villagers who were sick. The first one is in the house due east of Dr. Phlegming's house, one is the bunny girl in the inn, and the last two is in the house due east of the town. After visiting all of them, Dr. Phlegming will prompt you that he has seen enough. Return to his laboratory, after a cutscene, and an automatic rest in the inn, you will find that the town is happier that the day before. Stella will says that she sees Benevolessence everywhere, and they should be enough to start the Starflight Express. So now, use chimaera wing to teleport back to Angel Falls, and head to mountain pass.
Feather Headband. Then come back to the graveyard. You will find the ghost of the deceased patient. She will ask you to visit Dr. Phlegming's laboratory. Talk with him and he will suggest to visit all the villagers who were sick. The first one is in the house due east of Dr. Phlegming's house, one is the bunny girl in the inn, and the last two is in the house due east of the town. After visiting all of them, Dr. Phlegming will prompt you that he has seen enough. Return to his laboratory, after a cutscene, and an automatic rest in the inn, you will find that the town is happier that the day before. Stella will says that she sees Benevolessence everywhere, and they should be enough to start the Starflight Express. So now, use chimaera wing to teleport back to Angel Falls, and head to mountain pass.
Back to the Observatory
When you approach Starflight Express, a strange ghost girl will appear, and mumble "He is not here." Get on the train carriage, and finally, you will be able to return to the Observatory. Before you set going, Stella will ask you if you have any unfinished things to do (sounds to me like "Any last word?"). Ignore her and just say "no" because you will return to Protectorate in a short while. After the cutscene showing how Starflight Express ascend to the Observatory, you will seeApus Major leading other Celestrians praying to the Yggdrasil. Apus Major is delighted to see the Hero returned safely. After a talk with Apus Major in is throne room, he will tell you to pray to the Yggdrasil and see if the hero can get back his/her halo and wings. Before you go to Yggdrasil, go to Level 1, there was a locked room which is now unlocked. Go into the room, follow the corridor , you will find a Celestrian, Columba, praying to a grave stone of Corvus, Aquila's master. He will tell you that Aquila, the Hero's mentor, is also dispatched to the Protectorate to look for lost guardians, but he has not come back yet.
Now go to level 4 and pray to the Yggdrasil as instructed by Apus Major. After the prayer, the hero will have a vision, and will be told to collect the fyggs that fall into the Protectorate. You will learn a new skill Zoom which can teleport your hero to any visited town or village, from now on, Chimaera wing will be officially useless.
Apus Major will appear and talk with you, he agrees that you should follow the vision and go th the Protectorate to collect the fyggs. Board the Starflight Express again and speak with Stella, after the cutscene of Starflight Express' landing, you will be at a new region -- Newid Isle.