Orgodemir is the antagonist and the last boss of VII. He is the force behind all the evil that the Hero and his party encounter during the game.
Appearance
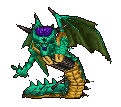
Orgodemir's true form is a monstrous demonic centipede with the upper body of a humanoid and draconic features. His head is enlarged, has a pair of large spikes on each side of it, and exposes his brain. His brain also has smaller spikes surrounding it. Orgodemir has three eyes with vertical pupils, pointed ears, a black spike on his chin, and a mouth lined with sharp fangs and a purple tongue. He has a pair of dragon wings on his back, a yellow bone-like structure which surrounds his torso, and a section on his chest similar in appearance to a rib cage. His lower back is covered in dorsal fins and small black spines, ending in a long black spike. The underside of his lower body is yellow. Orgodemir moves about by crawling on his various legs in a fashion similar to real-world centipedes. In the past, most of Orgodemir's body is beige, he has yellow eyes, his brain is red, the webbing on his wings is orange, and his chest, legs, and various spikes are all purple. In the present, most of Orgodemir's body is dark green, his eyes are red, his brain is purple, and the spikes on his body are black. In both of his forms, Orgodemir has long, sharp nails on his hands, which are purple in the past and black in the present.
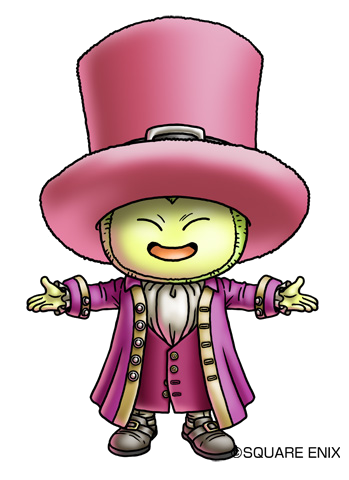
Orgodemir can also disguise himself in a humanoid form, retaining the pair of wings on his back along with his three eyes and long, pointed ears (however, the shape of wings differs rather noticeably, from ones of his real form). His skin is now pale green and his exaggerated facial features are meant to be physically attractive. He wears his silver hair in a long, slick forelock falling over his face. His eyes are white with red pupils and he wears dark blue eyeshadow on all three of his eyelids, as well as dark purple lipstick. Orgodemir wears a red-lined suit with a coattail and puffed sleeves that exposes most of his chest, a leather codpiece with a skull belt around his waist, and leather shoes with steel tips. He also wears an extensive amount of jewelry, including a single black hoop earring on his right ear and numerous earrings on his left ear, a leather choker and chain necklace around his neck, and various bones on his fingers. In the past, the suit he wears is red and the webbing on his wings is orange, while in the present he wears a purple suit and the webbing on his wings is green.
Personality
|
This article or section is blank! Please help Dragon Quest Wiki by expanding it. |
|
Biography
Games
Main Games
VII
Early History
Long before the game begins, Orgodemir set out to seal all lands and cast them in darkness. He was opposed by the Almighty and the Four Elemental Spirits: Earth, Fire, Water, and Wind. The Almighty was defeated and the four spirits were scattered. However, the Almighty had put a system into place that would allow the world to be reborn again within the Shrine of Mysteries.
Storyline
Although Orgodemir himself does not make an appearance until late in the story, his presence is felt throughout the various worlds the party visits. At Ballymolloy, the warrior Maeve is twisted into a monster by a mysterious evil voice. The Tinpot Dictator invades the land of Faraday with an army of Automatons on the orders of the Demon King, aided by the Slaughtomaton. At Alltrades Abbey, Cardinal Sin and his monsters concoct a devious plan in order to strengthen the Demon King with the stolen abilities of adventurers hoping to change their vocation there. In the land of Al-Balad, a group of monsters led by Setesh the Punisher forces the people to construct a monument in the likeness of the Demon King.
The kingdom of Buccanham is the only nation to pose a serious threat against the Demon King's reign. A band of pirates, led by Captain Sharkeye, braves the seas in their ship, the Sea Dragon and fights battles against the Demon King's monsters. However, their victories are short-lived, as Orgodemir encases the ship and its crew in ice, putting a stop to their heroics. The Demon King then places a curse on the kingdom of Buccanham, causing its newborns to be transformed into monsters on the first night after a full moon.
The Hero and his party travel to the past through the Excavated Cave underneath the Dig Site in the Roamer country. After putting the Mysterious Fragments into the pedastal there, they are transported to the Malign Shrine. They witness the Almighty sealing away Sir Mervyn in the Sizzling Stone and his defeat at the hands of the Demon King. After traversing through the stronghold, they encounter the Demon King. Orgodemir taunts the party by saying they are foolish to throw their lives away for the sake of the Almighty. He even allows them to walk away. However, if the player refuses, Orgodemir will fight the party.
When the player defeats Orgodemir, he tells them that although they were able to defeat his body, his soul will never die. With that, he disappears.
Shortly after, the party reunites with the present day Roamers in their ceremony to revive the Almighty. With Aishe dancing in the Vestment of Virtue and Crispin playing the Torban of Truth, the Almighty is revived. However, unbeknownst to the party, this is really Orgodemir in disguise. As the Almighty, Orgodemir thanks the party for reviving him and tells them that he will issue peace to the entire world.
Months later, Orgodemir, disguised as the Almighty, has the populace of the world build him a cathedral at the center of the world known as the Cathedral of Light. Sir Mervyn has been working with him as part of security. After its completion, he invites representatives from all nations to hear him speak. He tells them that he is the Almighty and that evil has been defeated. He instructs them to do dispose of their weapons as they will have no need for them and not to take the life of a human or a monster. Orgodemir, as the Almighty, then asks the Hero to give him the Dark Ruby as it is evil. With this, the audience with the Almighty is finished and he disappears. As the Hero's party leaves the Cathedral, they see Sir Mervyn being chased by soldiers, claiming that he has committed treason against the Almighty.
As the party leaves to return to Estard, the country is sealed and thrown into darkness. This is the work of Orgodemir. Sir Mervyn communicates this to the party via Mindspeak. He tells the party that the Almighty went about sealing the lands that he said were evil. When Sir Mervyn questioned this judgment, he was called a traitor. However, he learned of the four Elemental Spirits and they are the only beings able to shed light on the Almighty's actions. When the party awakens the Fire Spirit, they free the Sea Dragon and its crew from their icy prison, allowing Sharkeye and his band of pirates to assist the party's battle against the Demon King.
When the party find all the Elemental Spirits, they go to the Cathedral of Light and reveal that the Almighty is actually the Demon Lord. Unfortunately, this leaves the Spirits overtaxed and unable to defeat the Demon Lord. After his ruse is revealed, Orgodemir transforms the Cathedral of Light into the Cathedral of Blight and it serves as the final dungeon of the game. The party enters the Catheral of Blight and reaches the Demon Lord. He tells them that he is the new Almighty and that they will not be able to defeat him because they are ephemeral creatures. The party challenges Orgodemir.
With their victory, Orgodemir wonders why he was defeated and postulates the party is actually the Almighty. Orgodemir's final defeat brings peace to the world
Battle Strategy
The player fights Orgodemir twice at the end of each disc. In the first battle, he has two forms, and in the second battle, he has four forms.
Disc One Strategy
In Orgodemir first form, he has about 3000 HP. He can attack a maximum of three turns. His physical attacks hit for about 50 HP. At his disposal are Blazemore, Lightning, Magma, Explodet and Windbeast. He can put a party member to sleep with Suspicious Glint and can remove the party's positive status changes with Freezing Pulse.
Orgodemir's second form has about 4200 HP. He can attack twice in one round. He can charge the party member, causing about 150 HP in damage. He can spew cold air at the party for 50 HP, Scorching Air for about 100 HP and Vacuum for 80 HP. He can also use Freezing Pulse.
Orgodemir in the first disc can be a challenge depending on what classes the party has become. By this time, the party should have mastered some of the initial classes and be in intermediate classes. The Warrior/Dancer Hybrid technique SwordDance is an invaluable skill in this battle as it allows the player to attack 4 times. QuadHits also works as well. The Fighter's final technique, Windbeast, can cause 80-130 HP in damage. The Shepherd technique Woolguard will lessen the damage taken by breaths but will be removed by Freezing Pulse. It is recommended that one of your party members master the Cleric class so that they will have access to HealAll and Vivify. Also, the player should give one of the party member's the SageRock as it is comparable to a Healmore spell on the entire party. Other than that, use your strongest spells and skills to defeat Orgodemir.
Disc Two Strategy
Orgodemir's first form is like his second form in the first disc. He has about 3500 HP. He attacks the party with breath attacks. His Freezing breath hits for about 100 HP and Whitefire does 120 HP. Woolguard plus any armor that decreases flame or cold damage helps against this form. His physical attacks hit for 100-125 HP and he can whip his tail to hit everyone for 100 HP.
His second form is similar to his first form on the first disc. He has about 3300 HP. Like in the first disc, this form is mostly a spellcaster. He can attack three times. At his disposal are energy balls similar to Antoria in Dharma, Suspicious glint, Blazemost, DeMagic, Explodet, Punch, Freezing Pulse and WindBeast. He can also hurl intense flames which damages the party for 100 HP.
Orgodemir's third form has about 3000 HP. He can attack twice in one round. He can poison the party with PoisonFog, confuse a party member with ConfuHit, and use Terrifying Cry which hits the party and does about 150 HP.
His final form has about 5000 HP. In this form, he can summon a Bulbose and a Dagorlach. He can meditate to restore 500 HP. He can use WhiteFire and Megamagic which can cause 200+ HP in damages. He can also pray to restore his MP. He still has access to Freezing Pulse.
Fighting Orgodemir in the second disc is a challenge. The Godhand's Ultrahit really helps bring down his Health. SwordDance and Windbeast helps as well. One character should be assigned to healing the party. If that character has been a TeenIdol before, the skill Hustle is useful here. It also helps if one or two of your party members are in the Hero Class as they will gain health after every round of battle. Do not be afraid to use WorldDews and WorldLeaves. Use everything you have to finally defeat Orgodemir
IX
Battles
| #305 - Orgodemir ??? Family | |||||
|
HP | MP | Attack | Defence | Agility |
| ??? | ??? | ??? | ??? | ??? | |
| Exp | Gold | Drop | Multiple | ||
| ??? | 2490 G | ||||
| Description: Screams enemies into submission with a blood-curdling cry, then hits hard with Hellfire. Always attacks twice.
Doesn't like people to know he's really a dumpy dragon, so disguises himself as a dashing young dandy.
| |||||
| Encountered at: | |||||
| Grotto | |||||
Orgodemir appears as a Legacy Boss, obtained after completing Quest #176 (or received at special events).
Treasure
|
Skills
|
Battle Strategy
You should have a Priest and/or a Sage in your party. Equip that character with Minstrel's Manual to enable Gritty Ditty. The other three characters can be Warriors and/or Paladins. Equip these with Falcon Blades or Uber Falcon Blades. One of your fighters needs to have learned Fource abilities, equip that character with Armamentalist's Album to use Fources on all party members. Equip your healer and Fource caster with Meteorite Bracers or at least Agility Rings.
1st Turn: Cast Gritty Ditty and Fire Force on your party while the fighters use Falcon Slash.
2nd Turn: Cast Gritty Ditty a second time and have the 3 fighters using Falcon Slash.
Remaining Turns: Continue to Falcon Slash with fighters. Healer can either attack to drain MP or heal as needed.
If the boss uses Disruptive Wave, start the above steps over.
Side Games
Monsters 2
Recipe: PsychoPiz x Niterich
Joker
Orgodemir appears as a X rank undead monster in Dragon Quest Monsters: Joker. The Monster resembles the the second disc, first rank form in Dragon Quest VII.
Joker 2
His appearance is the same as his first form on the second disk. He is a rank x monster and is in the mystery family. You can obtain him by fusing Mortamor and an alabast dragon.
Manga
Warriors of Eden
- Main article: Orgodemir (Warriors of Eden)
Sprites
Other languages
| Other languages | |
| French | Orgodémir |
| German | Unknown |
| Spanish | Unknown |
| Italian | Unknown |
| Dutch | Unknown |
| Norwegian | Unknown |
| Greek | Unknown |
| Portuguese | Unknown |
| Russian | Unknown |
| Chinese | Unknown |
| Korean | Unknown |
Gallery
")
")
")
")
| This article is a stub. Please help Dragon Quest Wiki by expanding it. |
| Bosses in Dragon Quest IX | |||
|---|---|---|---|
| Storyline | Hexagoon · Wight Knight · Morag · Ragin' Contagion · Master of Nu'un · Lleviathan · Garth Goyle · Tyrantula · Grand Lizzier · Larstastnaras · Dreadmaster · Gadrongo · Greygnarl
| ||
| Post-Game Quests | |||
| Grotto bosses | |||
| Zenus | Equinox · Nemean · Shogum · Trauminator · Elusid · Sir Sanguinus · Atlas · Hammibal · Fowleye · Excalipurr | ||
| Legacy bosses | Dragonlord · Malroth · Baramos · Zoma · Psaro the Manslayer · Estark · Nimzo · Murdaw · Mortamor · Nokturnus · Orgodemir · Dhoulmagus · Rhapthorne | ||